
To use Explore, your agents need to be licensed, and given access. You control access to Explore using two methods, roles, and permissions.
Use this article to learn how to control access to Explore and ensure your business information is kept secure.
Understanding Explore roles
Explore features four user roles you can configure to help secure your reports and business information.
Editors
- Can create and customize new dashboards, queries, and datasets.
- Can edit created and shared dashboards, queries, and datasets.
- Can share dashboards with viewer groups.
- Can set dashboard email delivery schedules.
Admins
Admins have the same permissions as the editor role with the following additional capabilities:
- Can update editor permissions for custom datasets.
- Can change the default colors for charts and color-encoded metrics.
- Can edit Excel settings when exporting dashboards. This includes column and tab separators, decimal precision, decimal separator, and thousands separator.
- Can enable or disable access to the account by the Zendesk customer service team.
Viewers
- Cannot edit or create dashboards.
- Can only view dashboards shared with them and cannot view individual queries or datasets.
- Can access all of their shared dashboards via the Dashboard portal. The Dashboard portal is similar to the Dashboards library, but does not contain the option to create a new dashboard. The Dashboard portal will open automatically when viewers select the Explore icon (
 ) from the product tray.
No access
Agents with no access cannot view or access Explore. This is the default role assigned to new users.
Understanding the default role
The default role is configured on the admin page of Explore. This role is applied to an agent when they first connect to Explore and permissions have not been set in Zendesk Support.

Example: You imported agents from a CSV file so no permissions to Explore are applied. When the agent first signs on, they are applied the Explore default role.
You can change the default role for new Explore users on the Account information page of the Explore admin menu.
Understanding Explore permissions
Explore permissions are configured in the agent profile in Zendesk Support. Explore permissions are configured by an admin and override any default role that has been previously applied.
If the Explore switch in the agent’s profile is off, the agent cannot access Explore regardless of any other access settings.

Best practices for adding users
The following best practices will help you best manage your agents access to Explore:
- Always set the default role: When agents are added in bulk, for example from a CSV file, you’ll have set a base level of access. If you need to, you can modify access for selected users from their agent profile later.
- Always review Explore permissions when you add an agent: When you manually add an agent from Zendesk Support, or view the profile of an agent who has not yet accessed Explore, and you don’t change any permissions, the agent cannot access Explore. If you want the agent to have access, you can configure that at any time.
Configuring the default user role
To change the default Explore user role
- In Explore, click the admin icon (
 ).
). - The Dashboard email delivery page opens. From the menu on this page, click the account information icon (
 ).
). - From the Default Explore role drop-down list, choose the role you want to apply by default to all new Explore users, or choose No access if you want to manually give access to new users.
- When you are finished, click Update account.
Configuring user permissions
To configure user permissions
- In the Zendesk Support sidebar, click the Admin icon ().
- Select Manage > People.
- Select the user you want to configure.
- Make sure that the Explore switch is to On. You can also turn this off to stop a user from accessing Explore.
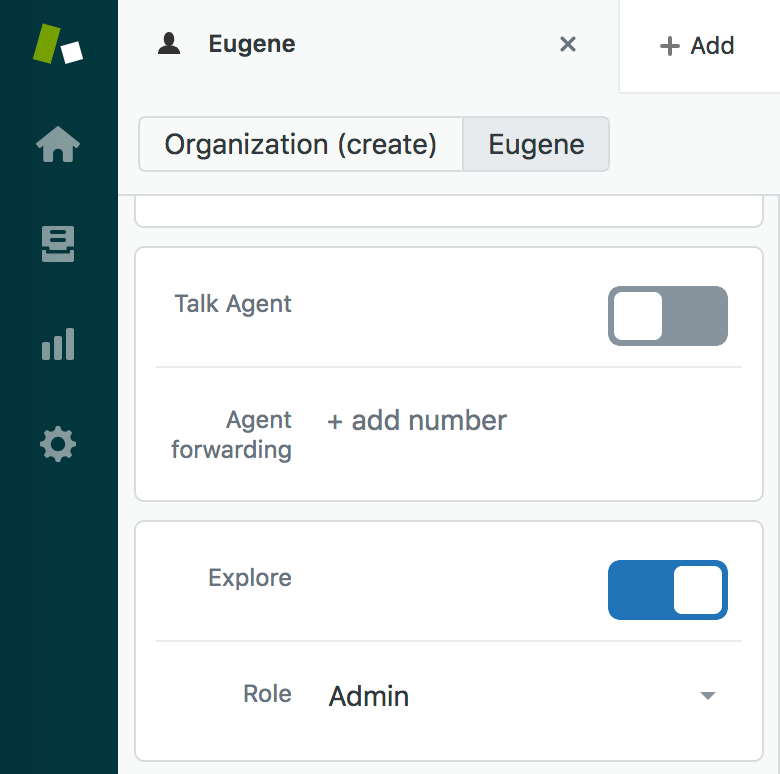
- In the Role drop-down list, choose the user permissions you want.

- Repeat the steps for other users you want to configure.